 |
||
|
Operation: Turkey Fry is your step-by-step guide to succulent turkey perfection. Deep frying a turkey will produce the juiciest, most flavorful bird you'll ever lay your taste buds upon. It also makes for a fairly entertaining afternoon. These ancient instructions, handed down to me in part by Mr. Philip Wise, have been around since 1995, with every single turkey a winner. Can't go wrong with a track record like that, eh? Disclaimer: Because this recipe requires flammable peanut oil and an open flame, we ask that you kids be careful. Keep those fire extinguishers handy. If the Super Friends have taught anything, it's that safety is first. SECTION ONE: TOOLS FOR THE JOB The Fryer: These days turkey fryers come in convenient kit form. The package usually contains a 25 to 40 quart aluminum pot, lid, turkey stand (or basket), and a lift-hook to lower and raise the turkey into the oil. Often they'll come with a long thermometer, though if it doesn't, you'll be needing one. It should have a 12"+ long sensor on it and read up to 400+ degrees Fahrenheit. These kits will run anywhere from $35.00 to $135.00. I've also seen a couple with glass lids, which is kinda cool... The Burner: Most of the kits come with a burner. If not, what you'll need is yer basic outdoor propane burner - one that will fit the aluminum pot. You'll also want a full bottle of propane (don't be caught short). Make sure the bottle connection type matches the burner connection. Of course, you'll also need a way to light this thing, such as one of those long BBQ starters - the kind with the covered trigger for easy old-west gun-fighter style twirlin'... The Peanut Oil: You're going to need a Sam's Club-sized jug of peanut oil. It usually comes in a box with a plastic container and several gallons of peanut oil for about $20.00. You can cook 12 to 15 turkeys in the same oil before it needs replacing. The oil will get darker with each use, and will need to be replaced when it starts affecting the color of the fried bird. The Seasoning Syringe: There are a couple different types out there - with either plastic or metal removable needles. Metal is for sure better - able to withstand the weekly usage you'll no doubt be subjecting it to after you've tasted a fried turkey. The Bird: Select a 12 to 14 pound plain turkey from your local grocery store. Don't bother with one of those fancy Butterball's as any butter inside will just melt out into the oil. It'll need to be thawed out the evening before you plan to cook it. This means if you purchase a rock-solid frozen turkey, plan on three full days of thaw time in your fridge prior to fry-day. For example, if the plan is to cook on Saturday, that frozen bird will ideally be in the refrigerator no later than Tuesday night. The Spices: 3 tablespoons Cajun Spices. We recommend Tony Cachere?s Creole Seasoning. Optionally, if you are from Texas or wish you were from Texas, you may want to toss in 1/4 to 1/2 teaspoon of cayenne pepper. The Funnel: Bigger is better. The Masonite (optional): I recommend a 4'x8' sheet Masonite or exterior wall board to put down under the burner. This will capture any oil that happens to over-flow or splash out (hot oil kills grass but good). Masonite is a cheap brown panel-board with a soft rough side and a hard smooth side. Doesn't cost much. I cut mine in half for easy portability and storage. The Gloves: A good idea when working with bubbling boiling oil. I suggest Eastman Outdoors 19-inch cooking gloves. Expensive, but heavy-duty. Regular oven-mits will do in a pinch (though it's hard to look manly in oven-mits). The Fire Extinguisher: Though I've never had to put one to use, it's a good idea to have a Class B fire extinguisher on hand during the cooking process. Never use water to extinguish an oil fire. The Timer: You should own a reliable timer anyway...
SECTION TWO: PREPARATION (ON THE NIGHT BEFORE) Keep in mind that it takes about three days for a frozen turkey to thaw in a refrigerator. If you aren't planning that far in advance, or can't afford that kinda refrigerator real-estate, try purchasing a fresh (non-frozen) turkey. On the evening before the fry, take the thawed turkey out, remove the giblets (guts), and rinse him down. Make a note of the turkey weight listed on the packaging tag. The cook time is going to be 3.25 minutes per pound of turkey. While it's kind of a pain, the best way to ensure your oil will not overflow and catch fire when you drop the turkey into the pot is to determine oil levels beforehand. Whenever your local news station runs that story on the fires and explosions caused by folks deep frying their Thanksgiving turkey, this is the step they conveniently skip... Prior to adding the spices into the turkey (see below), place him in the cooking pot and fill it with water. Remember, when it's hot oil you're putting the turkey into, it will boil up an additional 4 to 5 inches. Make sure you have just enough water to cover the entire turkey. Now remove the turkey and note the level of the water in the pot. That?s exactly where you'll want to fill the oil to prior to heating it up tomorrow. Important Note: if you don't remove the turkey from the water before marking the oil line, you'll end up with too much oil - exactly one turkey's worth of extra oil, in fact - and likely end up with over-flow. With his final bath out of the way, dump the 3 tablespoons of Cajun Spices into an 8 oz glass of water. Rumor has it this is even more effective if you allow the spices to dissolve in water overnight. To inject the spices into the turkey, stir up them up in the glass with a spoon and quickly fill the syringe. Remember to stir it each time you fill the syringe so the spices are suspended in the water as you draw it up into the syringe. Stick the needle in each breast at just one place, thrusting in and out and pushing the needle in a different direction each time. About four directions should be fine - up, down, left and right. It's also good to shoot some under the breast skin as well. Now repeat the injection process with each leg. Your bird is ready to rock and roll. Wrap him in tinfoil and stick him back in the fridge for the night.
SECTION THREE: DEEP FRY Despite what you may have heard on the street, turkey frying is not an indoor activity. The actual frying location should be outside in an area with plenty of ventilation. Inside your garage or covered porch is not a good idea. It's also best to be shielded from the wind, as the stronger the wind the longer the oil will take to heat up. Set your masonite board (smooth side up) down and place the burner in the center. Hook up the propane bottle to the cooker and light that baby up. On all the burners I've seen, there's a nozzle for controlling the flame where the hose connects to the propane tank. The goal is to have a strong blue flame (not yellow or red). The first time I tried out my Turkey Fryer kit the black enamel coating on the burner caught fire. As hazardous as that sounds, this is, apparently, normal for brand-new burners. It also made for a couple cool lookin' pictures:
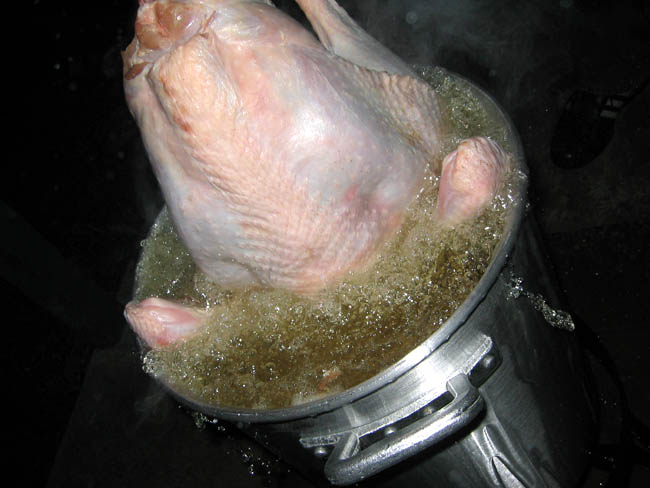
Next fill the pot with peanut oil no higher than the level you determined the previous night. Put the thermometer in the oil and let it rise to 360 degrees Fahrenheit, which can, depending on weather conditions, take just over a half hour. As high as 375 degrees is ok, but you shouldn?t go any hotter or the turkey may burn. If you don't have a thermometer, go ahead and use your finger to determine the temperature of the oil. If the flesh completely melts off, the temp is just about right. While waiting for the oil to reach 360, break out the turkey and stick him on the stand that came with the cooker. Once the oil is ready, turn down your flame and use the hook to slowly lower the turkey into the pot. Be aware there is going to be a rather dramatic reaction when the turkey hits that oil - it's quite a crowd pleaser, but don't let that distract you from slowly lowering the bird to the bottom of the pot. As you are dunking the turkey, the oil will rise to its highest level just before it fills the cavity of the bird - as seen in the video at the bottom of this page. This is critical for larger birds, as the oil can get pretty close to the top - just keep in mind it will lower a fair amount when it fills the inside of the bird. Once you've hit bottom, unhook the stand, put the lid on the pot, turn the flame back up, and start that timer.
Again, cooking time is 3.25 minutes per pound of turkey at between 360 and 375 degrees. Once fully submerged, that cool bird is going to bring down the temperature of the oil. It should slowly climb back up, though you might want to give it a little more propane to hurry things along. If you do give it more gas, be sure to watch that temperature and back off as it gets to 360 - don't overrun 375. If the temperature never gets back up to 360, go ahead and add a couple minutes onto the cook time. You don't need to cover the pot while you cook, though it will help bring the temperature back up, and will prevent bubbling oil from splashing about. You'll also look very professional as you remove the lid from time to time and peer into the pot, muttering to yourself "oh yeah" or "lookin' good there" or "mmm, that's about right", etc. When the time is up, use the hook to slowly pull the turkey back out. Have a metal tray handy to lay the cooked bird down upon. It's sure to be hot, so use those gloves to pull the stand out of the turkey (or remove the turkey from the basket, if your kit didn't come with a stand). Turkey skin should be a nice crispy brown.
If the plan is to eat soon, get it inside and slice that baby up! If dinner isn't for a while yet, try putting the turkey in a couple brown bags and stick the whole thing in an ice chest (sans the ice). It should stay very hot for several hours this way. This process will steam the bird, however, so the skin won't end up crispy (which is a bummer).
SECTION FOUR: CLEANUP After you take the turkey out of the oil, it's a good idea to toss in a peeled and sliced up russet potato. This will clarify the oil and help make it last longer. Once the tater cooks for a spell, fish it out, throw it away, and turn off the gas. Give the oil a couple hours to cool and pour it back into the jug using the funnel. Stop pouring when brown sludge is all that's left in the pot.
The empty pot will have quite a bit of dark residue left on the bottom. Use a generous wad of paper towels to clean it out, and then wash everything up with dishwashing liquid. The oil can be stored at room temperature in a basement, garage, or curio cabinet. Mission accomplished! The above methods should
work for other birds as well - chicken, basket-o-hot wings, etc. While I've
never actually tried it, you could probably fry up some twinkies, broccoli,
fish, or whatever. If you do experiment,
let us know how it goes... Movie 1: 10MB Movie 2: 6MB Movie 3: 5.3MB
|


